Add a Drawer to a screen
In apps that use Material Design, there are two primary options for navigation: tabs and drawers. When there is insufficient space to support tabs, drawers provide a handy alternative.
In Flutter, use the Drawer widget in combination with a
Scaffold to create a layout with a Material Design drawer.
This recipe uses the following steps:
- Create a
Scaffold. - Add a drawer.
- Populate the drawer with items.
- Close the drawer programmatically.
1. Create a Scaffold
To add a drawer to the app, wrap it in a Scaffold widget.
The Scaffold widget provides a consistent visual structure to apps that
follow the Material Design Guidelines.
It also supports special Material Design
components, such as Drawers, AppBars, and SnackBars.
In this example, create a Scaffold with a drawer:
Scaffold(
  drawer: // Add a Drawer here in the next step.
);
2. Add a drawer
Now add a drawer to the Scaffold. A drawer can be any widget,
but it’s often best to use the Drawer widget from the
material library,
which adheres to the Material Design spec.
Scaffold(
  drawer: Drawer(
    child: // Populate the Drawer in the next step.
  ),
);
3. Populate the drawer with items
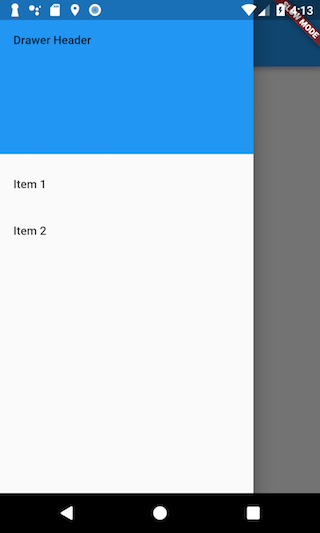
Now that you have a Drawer in place, add content to it.
For this example, use a ListView.
While you could use a Column widget,
ListView is handy because it allows users to scroll
through the drawer if the
content takes more space than the screen supports.
Populate the ListView with a DrawerHeader
and two ListTile widgets.
For more information on working with Lists,
see the list recipes.
Drawer(
  // Add a ListView to the drawer. This ensures the user can scroll
  // through the options in the drawer if there isn't enough vertical
  // space to fit everything.
  child: ListView(
    // Important: Remove any padding from the ListView.
    padding: EdgeInsets.zero,
    children: [
      const DrawerHeader(
        decoration: BoxDecoration(
          color: Colors.blue,
        ),
        child: Text('Drawer Header'),
      ),
      ListTile(
        title: const Text('Item 1'),
        onTap: () {
          // Update the state of the app.
          // ...
        },
      ),
      ListTile(
        title: const Text('Item 2'),
        onTap: () {
          // Update the state of the app.
          // ...
        },
      ),
    ],
  ),
);
4. Close the drawer programmatically
After a user taps an item, you might want to close the drawer.
You can do this by using the Navigator.
When a user opens the drawer, Flutter adds the drawer to the navigation
stack. Therefore, to close the drawer, call Navigator.pop(context).
ListTile(
  title: const Text('Item 1'),
  onTap: () {
    // Update the state of the app
    // ...
    // Then close the drawer
    Navigator.pop(context);
  },
),
Interactive example
import 'package:flutter/material.dart';

void main() => runApp(const MyApp());

class MyApp extends StatelessWidget {
  const MyApp({Key? key}) : super(key: key);

  static const appTitle = 'Drawer Demo';

  @override
  Widget build(BuildContext context) {
    return const MaterialApp(
      title: appTitle,
      home: MyHomePage(title: appTitle),
    );
  }
}

class MyHomePage extends StatelessWidget {
  const MyHomePage({Key? key, required this.title}) : super(key: key);

  final String title;

  @override
  Widget build(BuildContext context) {
    return Scaffold(
      appBar: AppBar(title: Text(title)),
      body: const Center(
        child: Text('My Page!'),
      ),
      drawer: Drawer(
        // Add a ListView to the drawer. This ensures the user can scroll
        // through the options in the drawer if there isn't enough vertical
        // space to fit everything.
        child: ListView(
          // Important: Remove any padding from the ListView.
          padding: EdgeInsets.zero,
          children: [
            const DrawerHeader(
              decoration: BoxDecoration(
                color: Colors.blue,
              ),
              child: Text('Drawer Header'),
            ),
            ListTile(
              title: const Text('Item 1'),
              onTap: () {
                // Update the state of the app
                // ...
                // Then close the drawer
                Navigator.pop(context);
              },
            ),
            ListTile(
              title: const Text('Item 2'),
              onTap: () {
                // Update the state of the app
                // ...
                // Then close the drawer
                Navigator.pop(context);
              },
            ),
          ],
        ),
      ),
    );
  }
}