Write your first Flutter app on the web
This is a guide to creating your first Flutter web app. If you are familiar with object-oriented programming, and concepts such as variables, loops, and conditionals, you can complete this tutorial. You don’t need previous experience with Dart, mobile, or web programming.
What you’ll build
You’ll implement a simple web app that displays a sign in screen. The screen contains three text fields: first name, last name, and username. As the user fills out the fields, a progress bar animates along the top of the sign in area. When all three fields are filled in, the progress bar displays in green along the full width of the sign in area, and the Sign up button becomes enabled. Clicking the Sign up button causes a welcome screen to animate in from the bottom of the screen.
The animated GIF shows how the app works at the completion of this lab.
Step 0: Get the starter web app
You’ll start with a simple web app that we provide for you.
-
Enable web development.
At the command line, perform the following commands to make sure that you have the latest web support and that it’s enabled. You only need to runflutter configonce to enable Flutter support for web. If you see “flutter: command not found”, then make sure that you have installed the Flutter SDK and that it’s in your path.$ flutter channel beta $ flutter upgrade $ flutter config --enable-webIf you have problems enabling web development, see Building a web application with Flutter.
-
Run
flutter doctor.
Theflutter doctorcommand reports the status of the installation. You should see something like the following:$ flutter doctor [✓] Flutter: is fully installed. (Channel dev, v1.9.5, on Mac OS X 10.14.6 18G87, locale en-US) [✗] Android toolchain - develop for Android devices: is not installed. [✗] Xcode - develop for iOS and macOS: is not installed. [✓] Chrome - develop for the web: is fully installed. [!] Android Studio: is not available. (not installed) [✓] Connected device: is fully installed. (1 available)It’s okay if the Android toolchain, Android Studio, and the Xcode tools are not installed, since the app is intended for the web only. If you later want this app to work on mobile, you will need to do additional installation and setup.
-
List the devices.
To ensure that web is installed, list the devices available. You should see something like the following:$ flutter devices 2 connected devices: Chrome • chrome • web-javascript • Google Chrome 78.0.3904.108 Web Server • web-server • web-javascript • Flutter ToolsThe Chrome device automatically starts Chrome. The Web Server starts a server that hosts the app so that you can load it from any browser. Use the Chrome device during development so that you can use DevTools, and the web server when you want to test on other browsers.
-
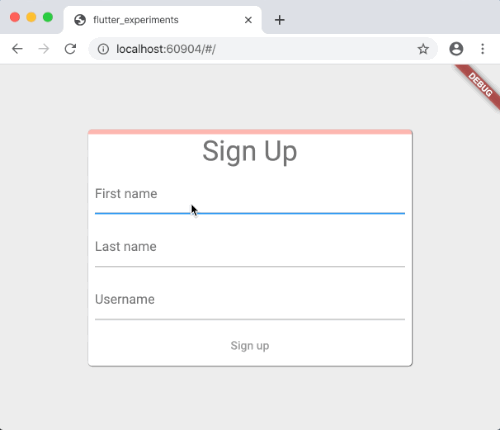
The starting app is displayed in the following DartPad.
{$ begin main.dart $} import 'package:flutter/material.dart'; void main() => runApp(SignUpApp()); class SignUpApp extends StatelessWidget { @override Widget build(BuildContext context) { return MaterialApp( routes: { '/': (context) => SignUpScreen(), }, ); } } class SignUpScreen extends StatelessWidget { @override Widget build(BuildContext context) { return Scaffold( backgroundColor: Colors.grey[200], body: Center( child: SizedBox( width: 400, child: Card( child: SignUpForm(), ), ), ), ); } } class SignUpForm extends StatefulWidget { @override _SignUpFormState createState() => _SignUpFormState(); } class _SignUpFormState extends State<SignUpForm> { final _firstNameTextController = TextEditingController(); final _lastNameTextController = TextEditingController(); final _usernameTextController = TextEditingController(); double _formProgress = 0; @override Widget build(BuildContext context) { return Form( child: Column( mainAxisSize: MainAxisSize.min, children: [ LinearProgressIndicator(value: _formProgress), Text('Sign up', style: Theme .of(context) .textTheme .headline4), Padding( padding: EdgeInsets.all(8.0), child: TextFormField( controller: _firstNameTextController, decoration: InputDecoration(hintText: 'First name'), ), ), Padding( padding: EdgeInsets.all(8.0), child: TextFormField( controller: _lastNameTextController, decoration: InputDecoration(hintText: 'Last name'), ), ), Padding( padding: EdgeInsets.all(8.0), child: TextFormField( controller: _usernameTextController, decoration: InputDecoration(hintText: 'Username'), ), ), TextButton( style: ButtonStyle( foregroundColor: MaterialStateProperty.resolveWith((Set<MaterialState> states) { return states.contains(MaterialState.disabled) ? null : Colors.white; }), backgroundColor: MaterialStateProperty.resolveWith((Set<MaterialState> states) { return states.contains(MaterialState.disabled) ? null : Colors.blue; }), ), onPressed: null, child: Text('Sign up'), ), ], ), ); } } {$ end main.dart $} {$ begin test.dart $} // Avoid warning on "double _formProgress = 0;" // ignore_for_file: prefer_final_fields {$ end test.dart $} -
Run the example.
Click the Run button to run the example. Note that you can type into the text fields, but the Sign up button is disabled. -
Copy the code.
Click the clipboard icon in the upper right of the code pane to copy the Dart code to your clipboard. -
Create a new Flutter project.
From your IDE, editor, or at the command line, create a new Flutter project and name itsignin_example. -
Replace the contents of
lib/main.dartwith the contents of the clipboard.
Observations
- The entire code for this example lives in the
lib/main.dartfile. - If you know Java, the Dart language should feel very familiar.
- All of the app’s UI is created in Dart code. For more information, see Introduction to declarative UI.
- The app’s UI adheres Material Design, a visual design language that runs on any device or platform. You can customize the Material Design widgets, but if you prefer something else, Flutter also offers the Cupertino widget library, which implements the current iOS design language. Or you can create your own custom widget library.
- In Flutter, almost everything is a Widget. Even the app itself is a widget. The app’s UI can be described as a widget tree.
Step 1: Show the Welcome screen
The SignUpForm class is a stateful widget.
This simply means that the widget stores information
that can change, such as user input, or data from a feed.
Since widgets themselves are immutable
(can’t be modified once created),
Flutter stores state information in a companion class,
called the State class. In this lab,
all of your edits will be made to the private
_SignUpFormState class.
First, in your lib/main.dart file,
add the following class definition for the
WelcomeScreen widget after the SignUpScreen class:
class WelcomeScreen extends StatelessWidget {
  @override
  Widget build(BuildContext context) {
    return Scaffold(
      body: Center(
        child: Text('Welcome!', style: Theme.of(context).textTheme.headline2),
      ),
    );
  }
}
Next, you will enable the button to display the screen and create a method to display it.
-
Locate the
build()method for the_SignUpFormStateclass. This is the part of the code that builds the SignUp button. Notice how the button is defined: It’s aTextButtonwith a blue background, white text that says Sign up and, when pressed, does nothing. -
Update the
onPressedproperty.
Change theonPressedproperty to call the (non-existent) method that will display the welcome screen.Change
onPressed: nullto the following:onPressed: _showWelcomeScreen, -
Add the
_showWelcomeScreenmethod.
Fix the error reported by the analyzer that_showWelcomeScreenis not defined. Directly above thebuild()method, add the following function:void _showWelcomeScreen() { Navigator.of(context).pushNamed('/welcome'); } -
Add the
/welcomeroute.
Create the connection to show the new screen. In thebuild()method forSignUpApp, add the following route below'/':'/welcome': (context) => WelcomeScreen(), -
Run the app.
The Sign up button should now be enabled. Click it to bring up the welcome screen. Note how it animates in from the bottom. You get that behavior for free.
Observations
- The
_showWelcomeScreen()function is used in thebuild()method as a callback function. Callback functions are often used in Dart code and, in this case, this means “call this method when the button is pressed”. - Flutter has only one
Navigatorobject. This widget manages Flutter’s screens (also called routes or pages) inside a stack. The screen at the top of the stack is the view that is currently displayed. Pushing a new screen to this stack switches the display to that new screen. This is why the_showWelcomeScreenfunction pushes theWelcomeScreenonto the Navigator’s stack. The user clicks the button and, voila, the welcome screen appears. Likewise, callingpop()on theNavigatorreturns to the previous screen. Because Flutter’s navigation is integrated into the browser’s navigation, this happens implicitly when clicking the browser’s back arrow button.
Step 2: Enable sign in progress tracking
This sign in screen has three fields. Next, you will enable the ability to track the user’s progress on filling in the form fields, and update the app’s UI when the form is complete.
-
Add a method to update
_formProgress. In the_SignUpFormStateclass, add a new method called_updateFormProgress():... void _updateFormProgress() { var progress = 0.0; final controllers = [ _firstNameTextController, _lastNameTextController, _usernameTextController ]; for (final controller in controllers) { if (controller.value.text.isNotEmpty) { progress += 1 / controllers.length; } } setState(() { _formProgress = progress; }); } ...This method updates the
_formProgressfield based on the the number of non-empty text fields. -
Call
_updateFormProgresswhen the form changes.
In thebuild()method of the_SignUpFormStateclass, add a callback to theFormwidget’sonChangedargument. Add the code below marked as NEW:... return Form( onChanged: _updateFormProgress, // NEW child: Column( ... -
Update the
onPressedproperty (again).
Instep 1, you modified theonPressedproperty for the Sign up button to display the welcome screen. Now, update that button to display the welcome screen only when the form is completely filled in:... TextButton( style: ButtonStyle( foregroundColor: MaterialStateProperty.resolveWith((Set<MaterialState> states) { return states.contains(MaterialState.disabled) ? null : Colors.white; }), backgroundColor: MaterialStateProperty.resolveWith((Set<MaterialState> states) { return states.contains(MaterialState.disabled) ? null : Colors.blue; }), ), onPressed: _formProgress == 1 ? _showWelcomeScreen : null, // UPDATED child: Text('Sign up'), ), ... -
Run the app.
The Sign up button is initially disabled, but becomes enabled when all three text fields contain (any) text.
Observations
- Calling a widget’s
setState()method tells Flutter that the widget needs to be updated on screen. The framework then disposes of the previous immutable widget (and its children), creates a new one (with its accompanying child widget tree), and renders it to screen. For this to work seamlessly, Flutter needs to be fast. The new widget tree must be created and rendered to screen in less than 1/60th of a second to create a smooth visual transition—especially for an animation. Luckily Flutter is fast. - The
progressfield is defined as a floating value, and is updated in the_updateFormProgressmethod. When all three fields are filled in,_formProgressis set to 1.0. When_formProgressis set to 1.0, theonPressedcallback is set to the_showWelcomeScreenmethod. Now that itsonPressedargument is non-null, the button is enabled. Like most Material Design buttons in Flutter, TextButtons are disabled by default if theironPressedandonLongPresscallbacks are null. - Notice that the
_updateFormProgresspasses a function tosetState(). This is called an anonymous function and has the following syntax:methodName(() {...});Where
methodNameis a named function that takes an anonymous callback function as an argument. - The Dart syntax in the last step that displays the
welcome screen is:
onPressed: _formProgress == 1 ? _showWelcomeScreen : null,This is a Dart conditional assignment and has the syntax:
condition ? expression1 : expression2. If the expression_formProgress == 1is true, the entire expression results in the value on the left hand side of the:, which is the_showWelcomeScreenmethod in this case.
Step 2.5: Launch Dart DevTools
How do you debug a Flutter web app? It’s not too different from debugging any Flutter app. You want to use Dart DevTools! (Not to be confused with Chrome DevTools.)
Our app currently has no bugs, but let’s check it out anyway. The following instructions for launching DevTools applies to any workflow, but there is a short cut if you’re using IntelliJ. See the tip at the end of this section for more information.
-
Run the app.
If your app isn’t currently running, launch it. Select the Chrome device from the pull down and launch it from your IDE or, from the command line, useflutter run -d chrome, -
Get the web socket info for DevTools.
At the command line, or in the IDE, you should see a message stating something like the following:Launching lib/main.dart on Chrome in debug mode... Building application for the web... 11.7s Attempting to connect to browser instance.. Debug service listening on **ws://127.0.0.1:54998/pJqWWxNv92s=**Copy the address of the debug service, shown in bold. You will need that to launch DevTools.
-
Ensure that DevTools is installed.
Do you have DevTools installed? If you are using an IDE, make sure you have the Flutter and Dart plugins set up, as described in the VS Code and Android Studio and IntelliJ pages. If you are working at the command line, launch the DevTools server as explained in the DevTools command line page. -
Connect to DevTools.
When DevTools launches, you should see something like the following:Serving DevTools at http://127.0.0.1:9100Go to this URL in a Chrome browser. You should see the DevTools launch screen. It should look like the following:
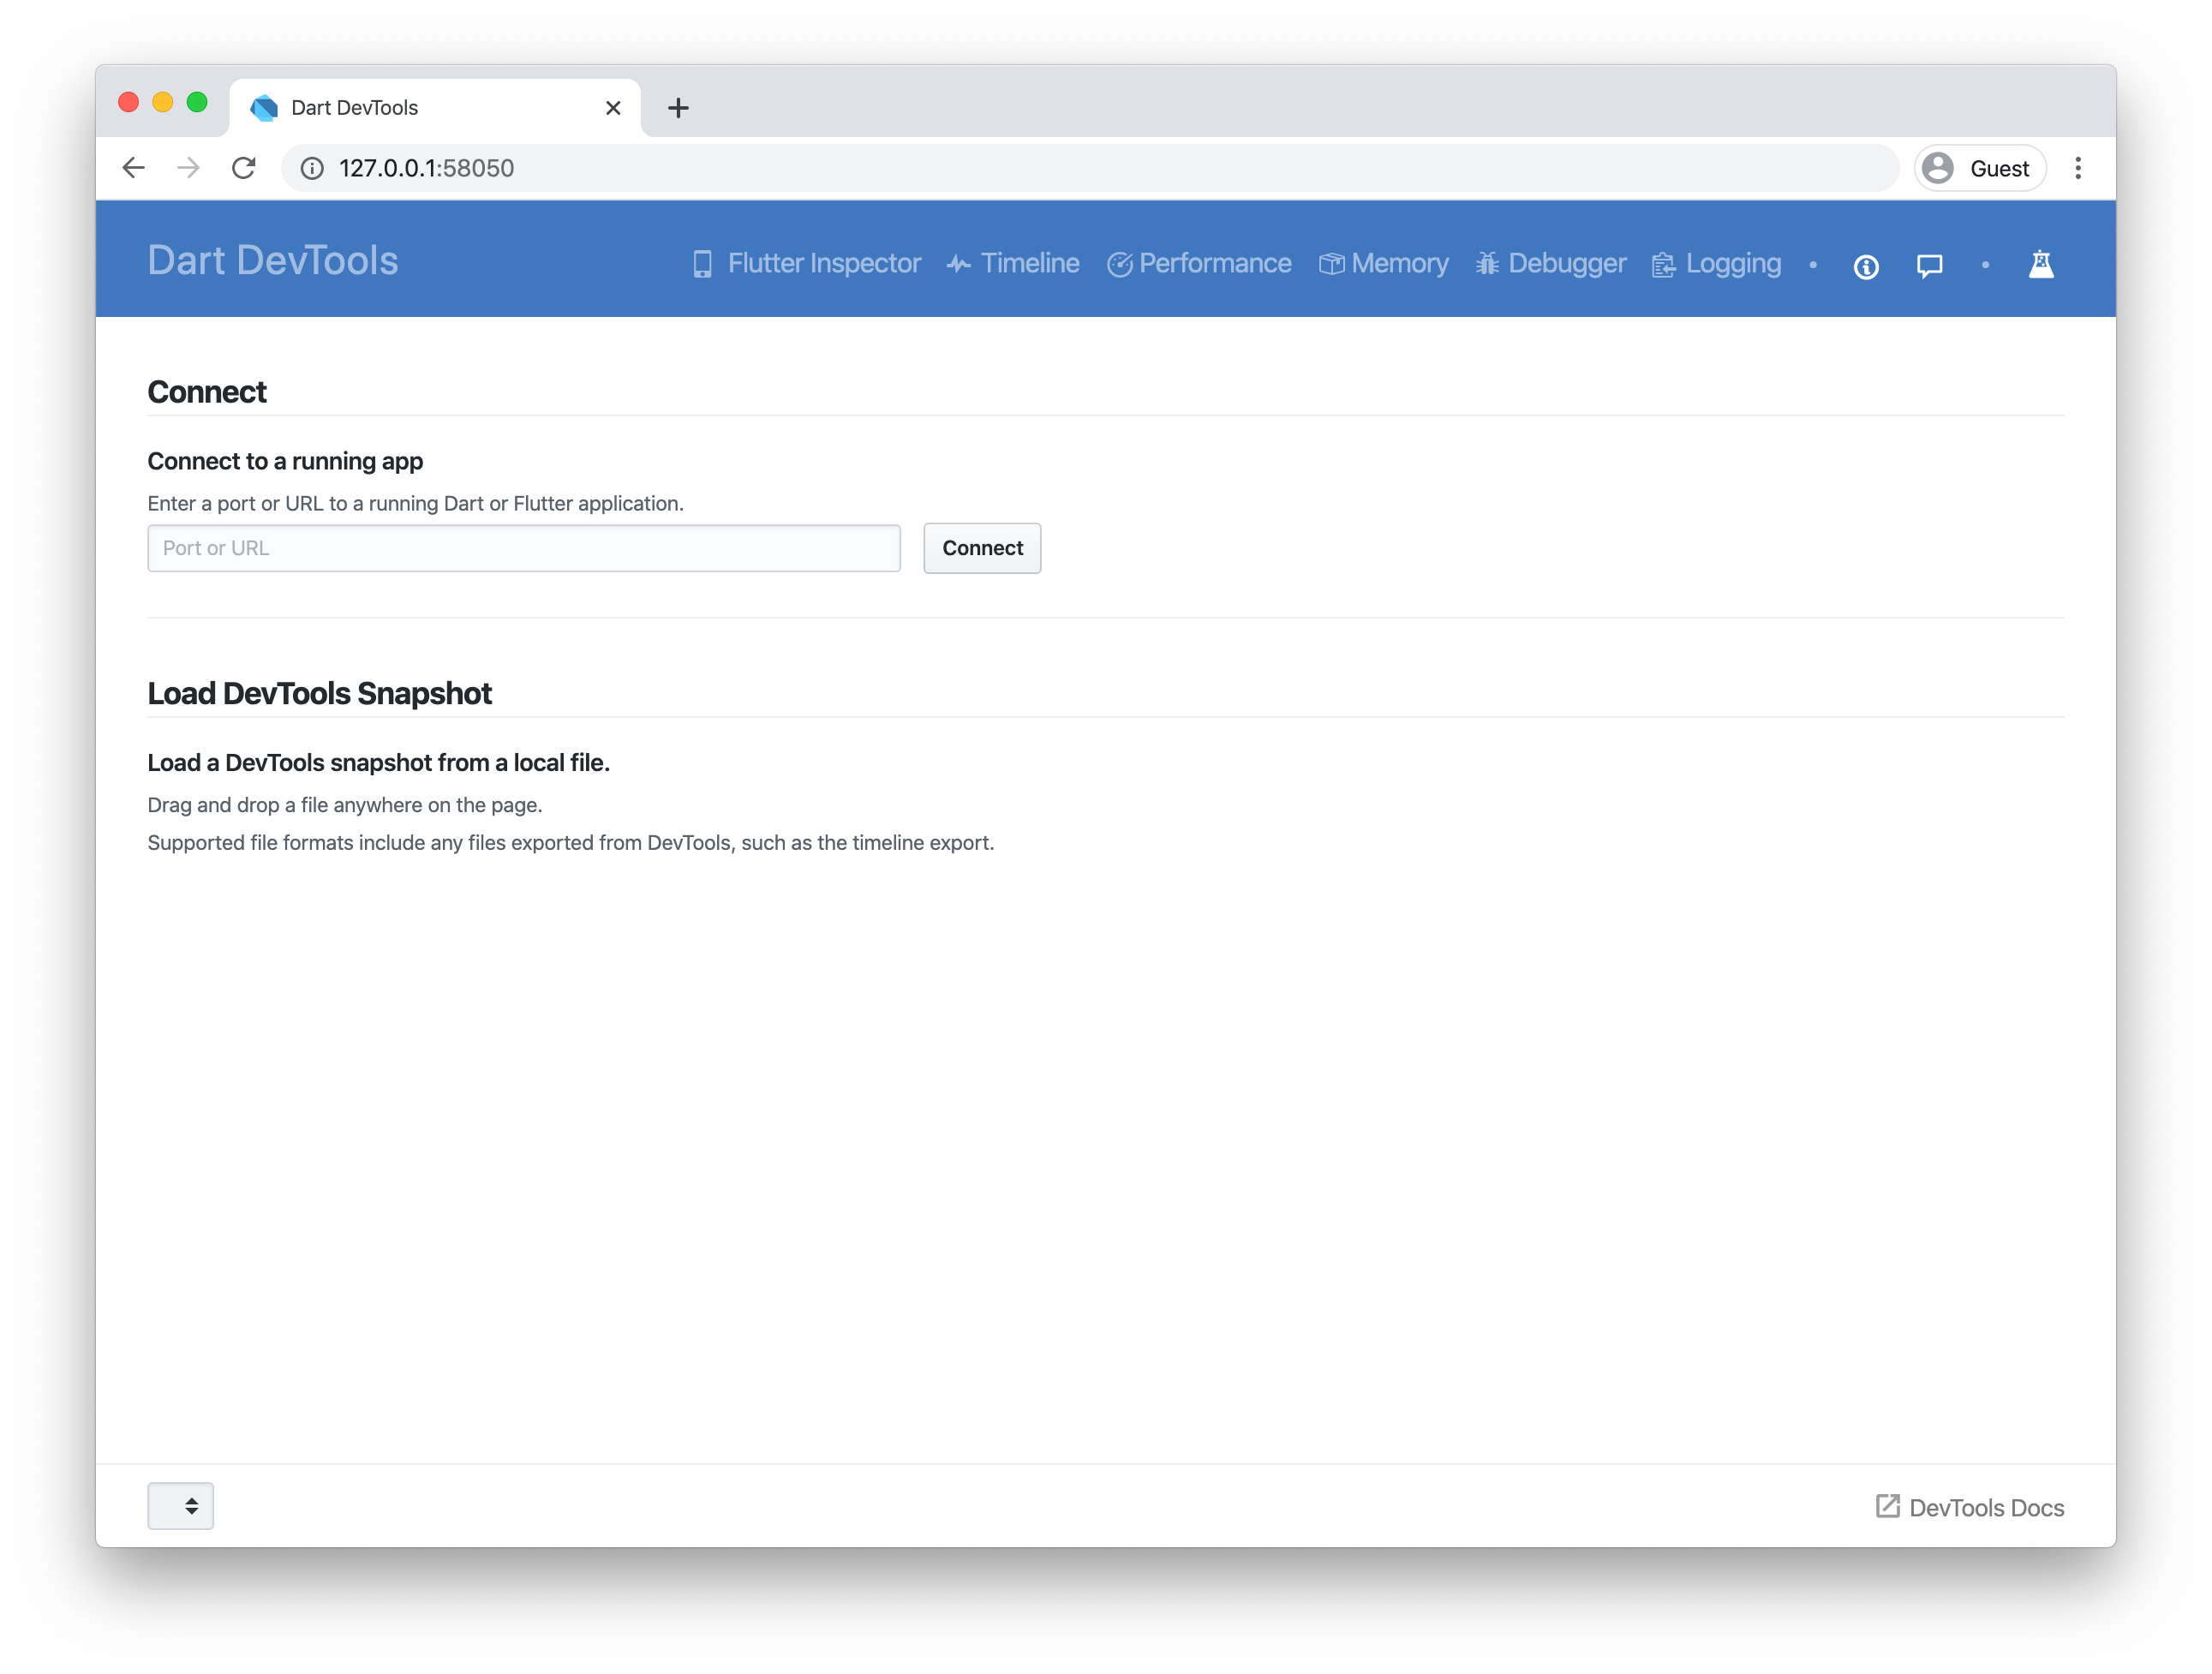
-
Connect to running app.
Under Connect to a running site, paste the ws location that you copied in step 2, and click Connect. You should now see Dart DevTools running successfully in your Chrome browser: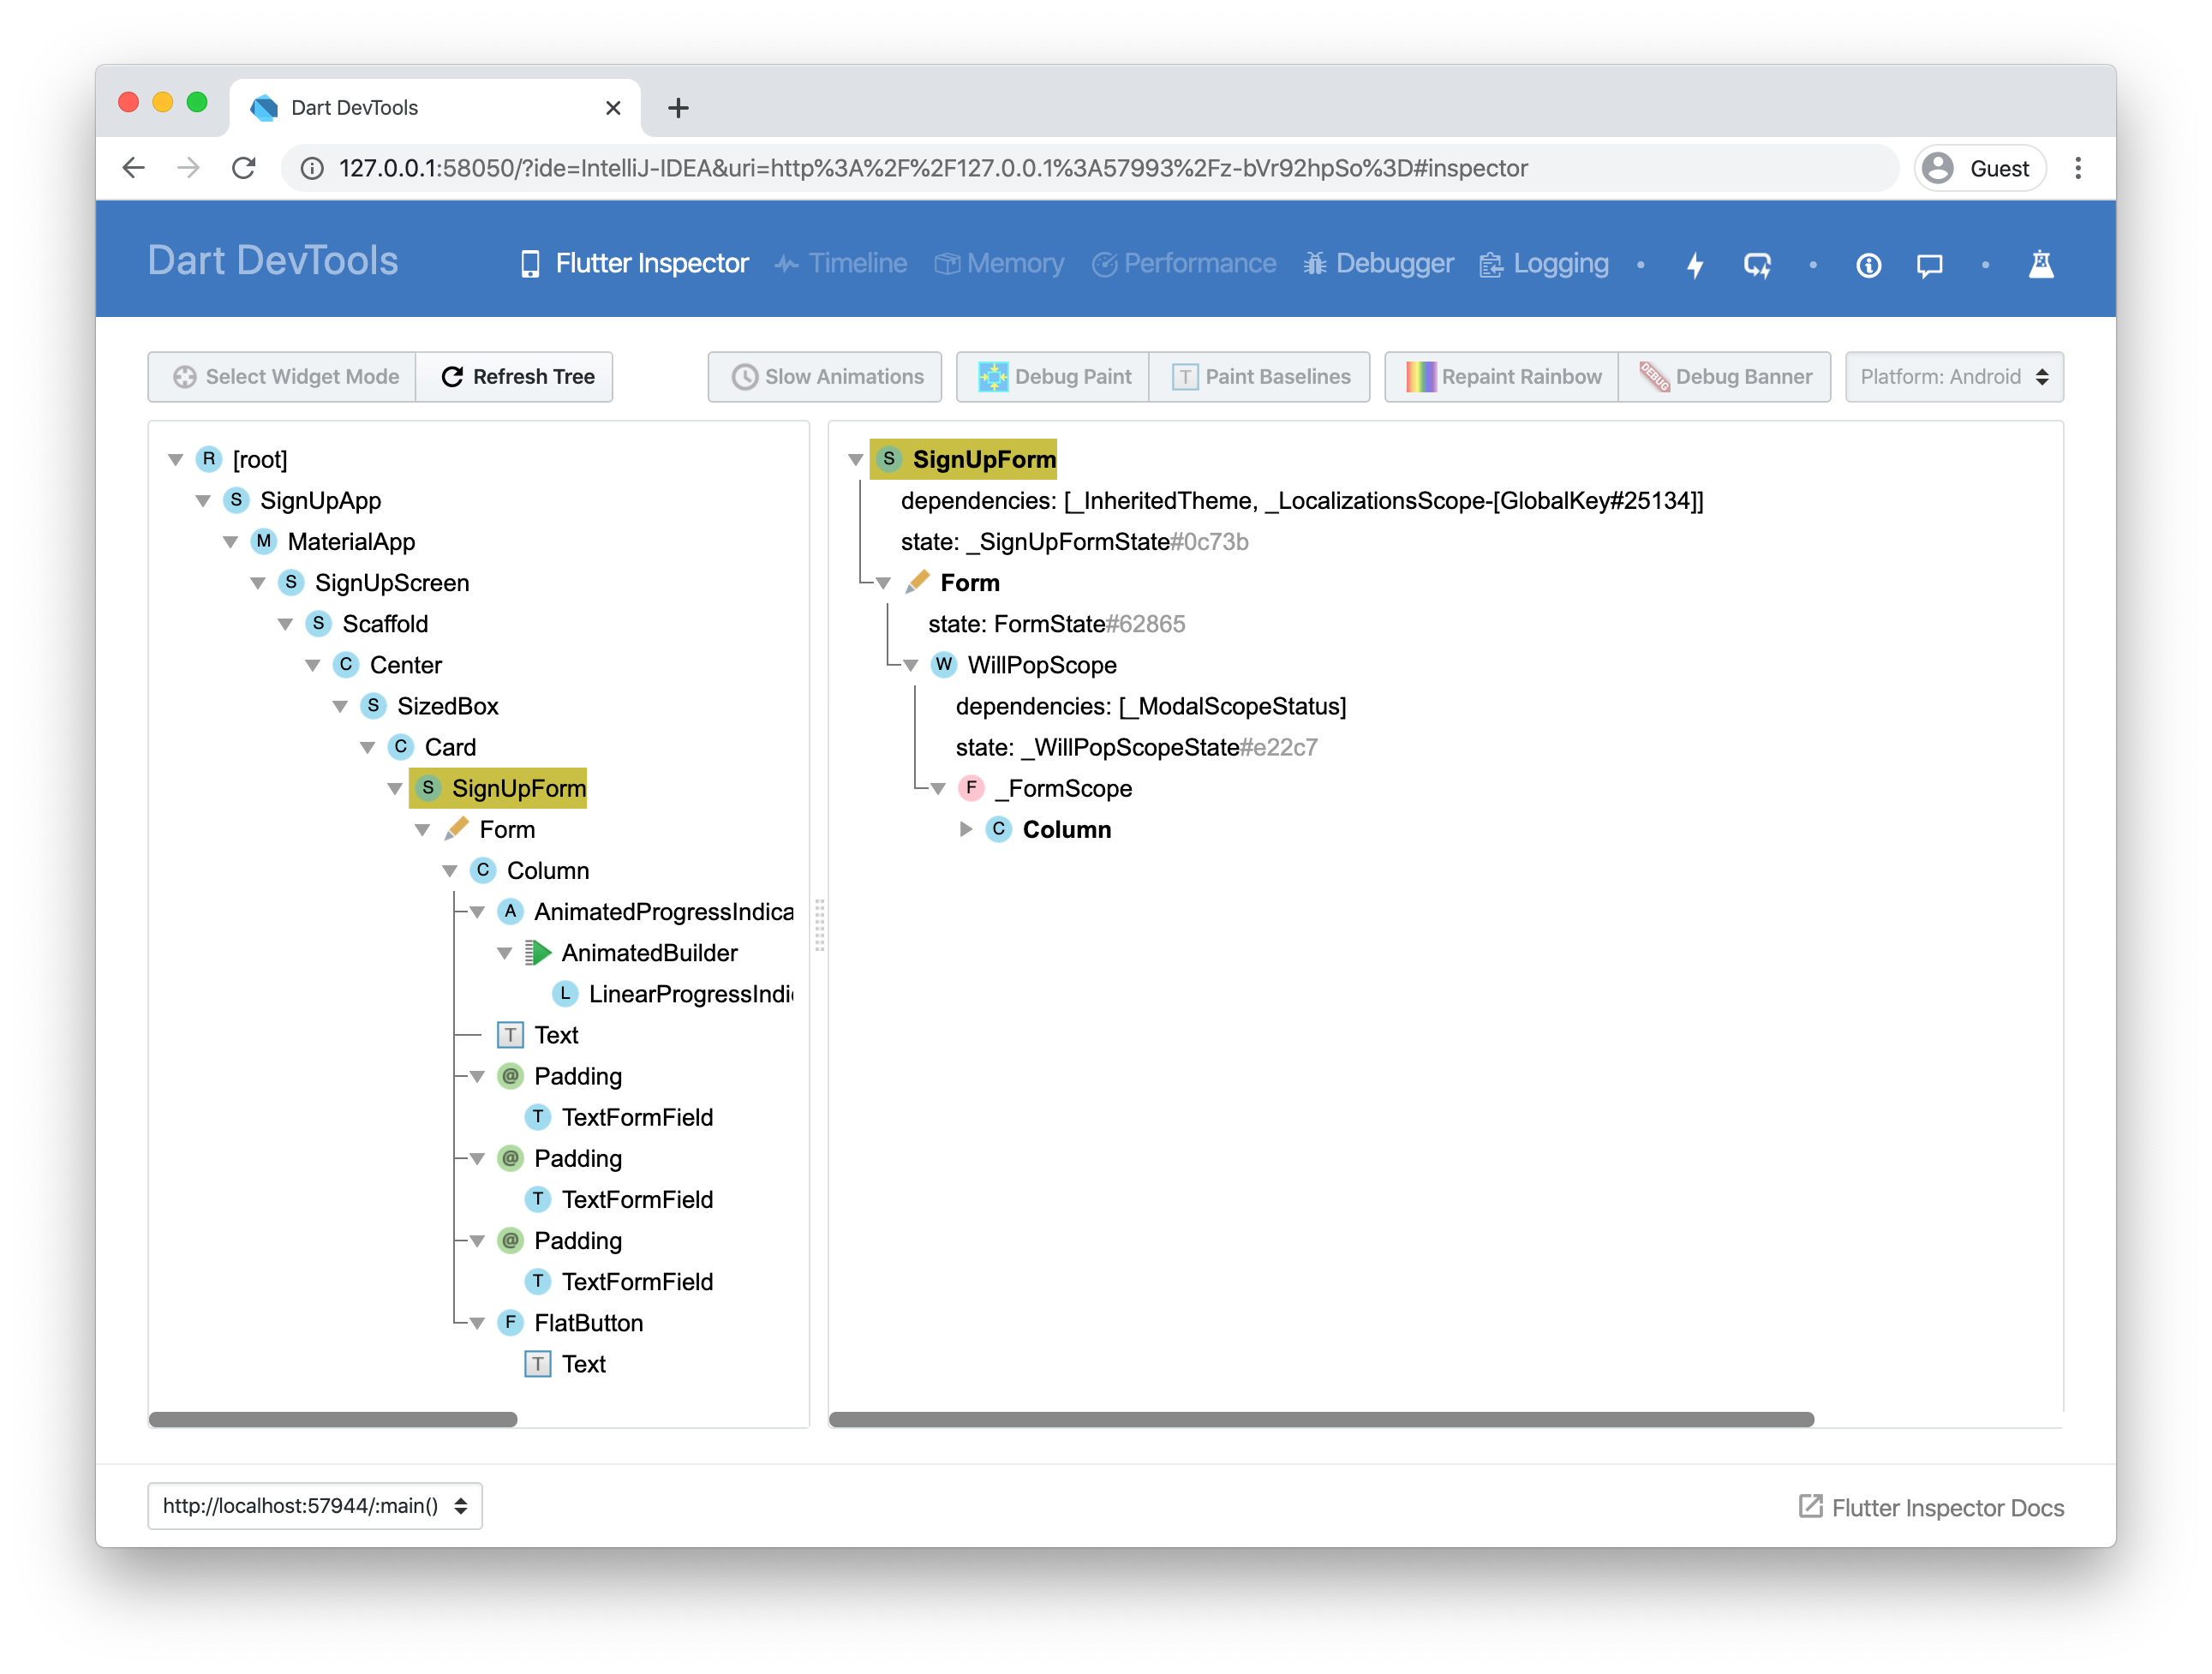
Congratulations, you are now running Dart DevTools!
-
Set a breakpoint.
Now that you have DevTools running, select the Debugger tab in the blue bar along the top. The debugger pane appears and, in the lower left, see a list of libraries used in the example. Selectsignin/main.dartto display your Dart code in the center pane.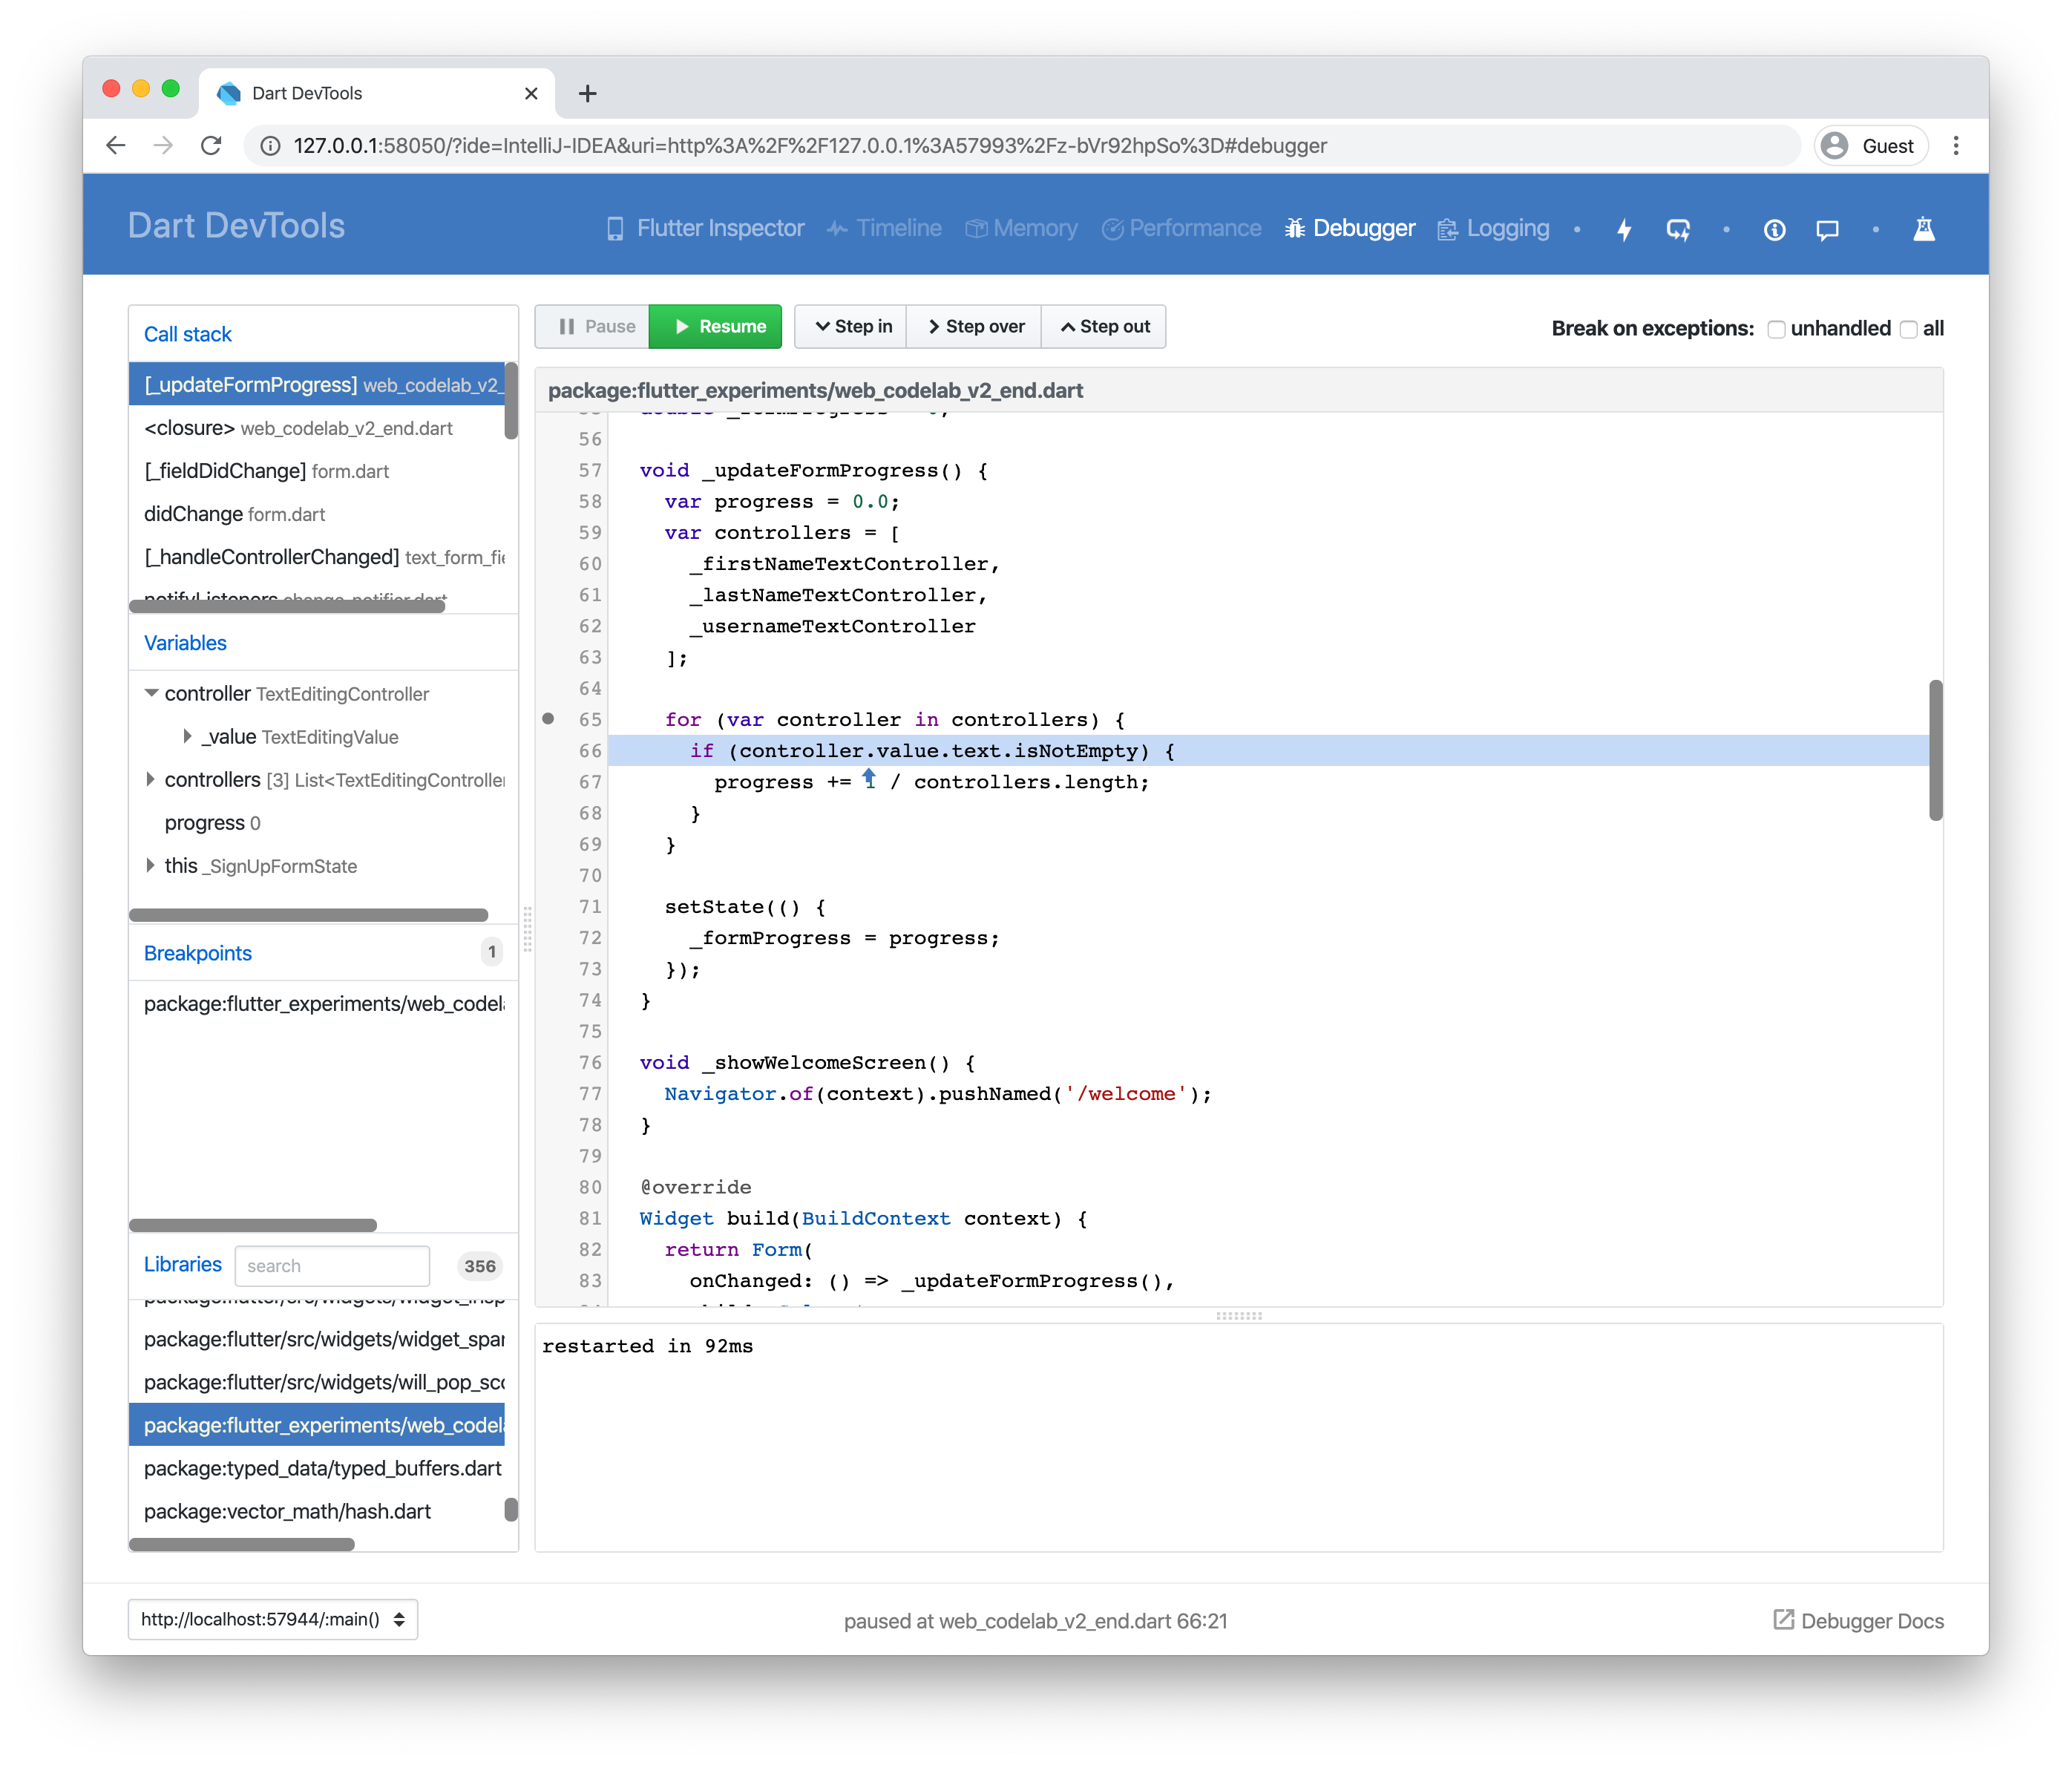
-
Set a breakpoint.
In the Dart code, scroll down to whereprogressis updated:for (final controller in controllers) { if (controller.value.text.isNotEmpty) { progress += 1 / controllers.length; } }Place a breakpoint on the line with the for loop by clicking to the left of the line number. The breakpoint now appears in the Breakpoints section to the left of the window.
-
Trigger the breakpoint.
In the running app, click one of the text fields to gain focus. The app hits the breakpoint and pauses. In the DevTools screen, you can see on the left the value ofprogress, which is 0. This is to be expected, since none of the fields are filled in. Step through the for loop to see the program execution. -
Resume the app.
Resume the app by clicking the green Resume button in the DevTools window. -
Delete the breakpoint.
Delete the breakpoint by clicking it again, and resume the app.
This gives you a tiny glimpse of what is possible using DevTools, but there is lots more! For more information, see the DevTools documentation.
Step 3: Add animation for sign in progress
It’s time to add animation! In this final step,
you’ll create the animation for the
LinearProgressIndicator at the top of the sign in
area. The animation has the following behavior:
- When the app starts, a tiny red bar appears across the top of the sign in area.
- When one text field contains text, the red bar turns orange and animates 0.15 of the way across the sign in area.
- When two text fields contain text, the orange bar turns yellow and animates half of the way across the sign in area.
- When all three text fields contain text, the orange bar turns green and animates all the way across the sign in area. Also, the Sign up button becomes enabled.
-
Add an
AnimatedProgressIndicator.
At the bottom of the file, add this widget:class AnimatedProgressIndicator extends StatefulWidget { final double value; AnimatedProgressIndicator({ required this.value, }); @override State<StatefulWidget> createState() { return _AnimatedProgressIndicatorState(); } } class _AnimatedProgressIndicatorState extends State<AnimatedProgressIndicator> with SingleTickerProviderStateMixin { late AnimationController _controller; late Animation<Color?> _colorAnimation; late Animation<double> _curveAnimation; void initState() { super.initState(); _controller = AnimationController( duration: Duration(milliseconds: 1200), vsync: this); final colorTween = TweenSequence([ TweenSequenceItem( tween: ColorTween(begin: Colors.red, end: Colors.orange), weight: 1, ), TweenSequenceItem( tween: ColorTween(begin: Colors.orange, end: Colors.yellow), weight: 1, ), TweenSequenceItem( tween: ColorTween(begin: Colors.yellow, end: Colors.green), weight: 1, ), ]); _colorAnimation = _controller.drive(colorTween); _curveAnimation = _controller.drive(CurveTween(curve: Curves.easeIn)); } @override void didUpdateWidget(oldWidget) { super.didUpdateWidget(oldWidget); _controller.animateTo(widget.value); } @override Widget build(BuildContext context) { return AnimatedBuilder( animation: _controller, builder: (context, child) => LinearProgressIndicator( value: _curveAnimation.value, valueColor: _colorAnimation, backgroundColor: _colorAnimation.value?.withOpacity(0.4), ), ); } }The
didUpdateWidgetfunction updates theAnimatedProgressIndicatorStatewheneverAnimatedProgressIndicatorchanges. -
Use the new
AnimatedProgressIndicator.
Then, replace theLinearProgressIndicatorin theFormwith this newAnimatedProgressIndicator:... child: Column( mainAxisSize: MainAxisSize.min, children: [ AnimatedProgressIndicator(value: _formProgress), // NEW Text('Sign up', style: Theme.of(context).textTheme.headline4), Padding( ...This widget uses an
AnimatedBuilderto animate the progress indicator to the latest value. -
Run the app.
Type anything into the three fields to verify that the animation works, and that clicking the Sign up button brings up the Welcome screen.
Complete sample
import 'package:flutter/material.dart';
void main() => runApp(SignUpApp());
class SignUpApp extends StatelessWidget {
@override
Widget build(BuildContext context) {
return MaterialApp(
routes: {
'/': (context) => SignUpScreen(),
'/welcome': (context) => WelcomeScreen(),
},
);
}
}
class SignUpScreen extends StatelessWidget {
@override
Widget build(BuildContext context) {
return Scaffold(
backgroundColor: Colors.grey[200],
body: Center(
child: SizedBox(
width: 400,
child: Card(
child: SignUpForm(),
),
),
),
);
}
}
class WelcomeScreen extends StatelessWidget {
@override
Widget build(BuildContext context) {
return Scaffold(
body: Center(
child: Text('Welcome!', style: Theme.of(context).textTheme.headline2),
),
);
}
}
class SignUpForm extends StatefulWidget {
@override
_SignUpFormState createState() => _SignUpFormState();
}
class _SignUpFormState extends State<SignUpForm> {
final _firstNameTextController = TextEditingController();
final _lastNameTextController = TextEditingController();
final _usernameTextController = TextEditingController();
double _formProgress = 0;
void _updateFormProgress() {
var progress = 0.0;
final controllers = [
_firstNameTextController,
_lastNameTextController,
_usernameTextController
];
for (final controller in controllers) {
if (controller.value.text.isNotEmpty) {
progress += 1 / controllers.length;
}
}
setState(() {
_formProgress = progress;
});
}
void _showWelcomeScreen() {
  Navigator.of(context).pushNamed('/welcome');
}
@override
Widget build(BuildContext context) {
return Form(
onChanged: _updateFormProgress,
child: Column(
mainAxisSize: MainAxisSize.min,
children: [
AnimatedProgressIndicator(value: _formProgress),
Text('Sign up', style: Theme.of(context).textTheme.headline4),
Padding(
padding: EdgeInsets.all(8.0),
child: TextFormField(
controller: _firstNameTextController,
decoration: InputDecoration(hintText: 'First name'),
),
),
Padding(
padding: EdgeInsets.all(8.0),
child: TextFormField(
controller: _lastNameTextController,
decoration: InputDecoration(hintText: 'Last name'),
),
),
Padding(
padding: EdgeInsets.all(8.0),
child: TextFormField(
controller: _usernameTextController,
decoration: InputDecoration(hintText: 'Username'),
),
),
TextButton(
style: ButtonStyle(
foregroundColor: MaterialStateProperty.resolveWith((Set<MaterialState> states) {
return states.contains(MaterialState.disabled) ? null : Colors.white;
}),
backgroundColor: MaterialStateProperty.resolveWith((Set<MaterialState> states) {
return states.contains(MaterialState.disabled) ? null : Colors.blue;
}),
),
onPressed: _formProgress == 1 ? _showWelcomeScreen : null,
child: Text('Sign up'),
),
],
),
);
}
}
class AnimatedProgressIndicator extends StatefulWidget {
final double value;
AnimatedProgressIndicator({
required this.value,
});
@override
State<StatefulWidget> createState() {
return _AnimatedProgressIndicatorState();
}
}
class _AnimatedProgressIndicatorState extends State<AnimatedProgressIndicator>
with SingleTickerProviderStateMixin {
late AnimationController _controller;
late Animation<Color?> _colorAnimation;
late Animation<double> _curveAnimation;
void initState() {
super.initState();
_controller = AnimationController(
duration: Duration(milliseconds: 1200), vsync: this);
final colorTween = TweenSequence([
TweenSequenceItem(
tween: ColorTween(begin: Colors.red, end: Colors.orange),
weight: 1,
),
TweenSequenceItem(
tween: ColorTween(begin: Colors.orange, end: Colors.yellow),
weight: 1,
),
TweenSequenceItem(
tween: ColorTween(begin: Colors.yellow, end: Colors.green),
weight: 1,
),
]);
_colorAnimation = _controller.drive(colorTween);
_curveAnimation = _controller.drive(CurveTween(curve: Curves.easeIn));
}
void didUpdateWidget(oldWidget) {
super.didUpdateWidget(oldWidget);
_controller.animateTo(widget.value);
}
@override
Widget build(BuildContext context) {
return AnimatedBuilder(
animation: _controller,
builder: (context, child) => LinearProgressIndicator(
value: _curveAnimation.value,
valueColor: _colorAnimation,
backgroundColor: _colorAnimation.value?.withOpacity(0.4),
),
);
}
}
Observations
- You can use an
AnimationControllerto run any animation. -
AnimatedBuilderrebuilds the widget tree when the value of anAnimationchanges. - Using a
Tween, you can interpolate between almost any value, in this case,Color.
What next?
Congratulations! You have created your first web app using Flutter!
If you’d like to continue playing with this example, perhaps you could add form validation. For advice on how to do this, see the Building a form with validation recipe in the Flutter cookbook.
For more information on Flutter web apps, Dart DevTools, or Flutter animations, see the following: